Showing posts with label red riding hood. Show all posts

Wednesday, June 27, 2012

The Tale of Rose Red, Part 4

The blouse is finished!


(Reference photo)

Last night was a magical night on the sewing front. I called a friend to ask if I could raid her elastic supply since I needed elastic to proceed and I didn't feel like driving all the way to the nearest place I could get some.

She brought some 1/4" and 1/8" samples. Sandry has a cool stitch that allows me to zig zag elastic straight onto a gather without having to worry about casing and the like, and I'd already practiced using it some weeks earlier. So after a quick trial run with the crinkle chiffon fabric I was able to finish off the garment in the following steps:

(1) I narrow hem serged the edges of the cuffs.
(2) Gathered the cuffs and sewed down the elastic.
(3) Assembled the four pieces of the peasant blouse (back, front, two sleeves). I believe I may have mentioned in an earlier post about how much I adore the simplicity of this shirt's construction. Or maybe that was just on Facebook.
(4) Narrow hem serged the edge of the neckline and hem.
(5) Did a test gather of the neckline and a fitting.

Now, here is where the turn of events took me by surprise. My game plan has always been up to this point to build a casing for the neck, make a drawstring, and finish off the shirt in that way (see reference photo). But as soon as I put the shirt on it became apparent that even were I to do all that, it wouldn't really resemble Red's blouse exactly because her shirt is much more gathered than mine will ever be. I needed about twice the shirt.

What I did have was lovely and "close enough". I also felt emboldened by my success with the elastic on the cuffs so instead of bothering with casing and all that extra work, I just took the rest of the 1/8" elastic and did the same thing to the neckline. The result is what you see at the top of this post.

(If you squint you can kinda sorta see the zig zag stitches that attach the elastic to the fabric)


Technically, I still have to add a faux bow to "complete" the shirt, but that's an afterthought.

So after probably four complete days' worth of work testing the sleeves, practicing special stitches on my new machine, and learning new techniques on my serger, all my hard work came together in one surprisingly productive evening and a finished garment.

The even better news? I chose starting with the blouse because I knew all this learning and trial and error would probably make it the most difficult of all of Red's ensemble for me. So, theoretically, it's all downhill from here!

Let's check the to-do list:

I. Blouse
II. Vest
III. Skirt
IV. Cape
V. Petticoat
VI. Boots, Gloves
VII. Hair, Basket, etc.
So I'll be eagerly working on the vest, next, which is #2 in intimidation factor because of the Very Special and Expensive fabric that I bought. It's also my first time using boning as called for by a pattern, but that doesn't really worry me. 

First, though, I'll work up a summary reference post on how I made the blouse (including specific adjustments, etc), should anyone wish to emulate my take on it.

Monday, June 25, 2012

The Tale of Rose Red, Part 3

The Music Man is over! It was a good time overall, but I'm glad the demanding rehearsal and performance schedules are through and I can return my energies to fannish pursuits. At least until the end of August when auditions for Little Women are coming up!

In the past three days I have made splendid progress on Red Riding Hood, particularly finishing off my trial and error with the sleeves and getting them all ready to go for the final product.


When we last left off, the test sleeve looked nice, but wasn't quite close enough to the source costume for my liking. The lace sections were too low on the sleeve compared to Red's.


I cut everything out again, this time moving all the dividers up four inches. After patiently joining and inserting into the test blouse, I was pleased to find the lace fell more or less in the right places this time around. It was still too long and too poofy, though, so I made a few more adjustments to my pattern based on that. (Didn't bother cutting out and testing a third time, though)


The final custom pattern. The darker stripe in the middle is from where I narrowed the sleeve by 2 1/2 inches. I also cut the same amount from the length of the sleeve, taking it from the top half of the fifth section of the pattern. Once nice thing about narrowing the sleeve is that the original sleeve pattern was too big to fold my pattern material and cut 2 simultaneously. Now I was able to do just that (yay, convenience!!)


The next step was to cut out the layers in both my "base" fabric and the lace I bought to go in between. Since neither of these fabrics has an easily discernible "wrong"side, I wrote out a label for all ten pieces as shown above to make sure I didn't get the pieces for the two sleeves mixed up until they were assembled.


Then, I used the serger to finish the edges of each strip with a narrow rolled hem. This took almost a full day of reading, experimenting, and one case of getting up and walking away in order to cool down before beginning again. It's the first time I've used Sergio's narrow rolled hem application, and for the most part I did a good job of allowing myself to learn as well as to apply. As usual, I made it extra hard on myself by choosing two tricky fabrics to work with. As you can see above, the base fabric is very stretchy, and the lace comes with its own set of problems. But Sergio and I worked together and eventually got it sorted.


One interesting side effect of serging the stretchy fabric was that the fabric, well, stretched. That is, it stretched out to where the pieces ended up being longer than their originating fabrics, as shown above. Still, far better than if the serger had somehow shrunk them I suppose.


I joined the pieces together as shown above, always with the lace on top for pinning purposes, and then used two rows of top stitching on the machine to complete the process. I got better and better at this as I went along, so my second sleeve is predictably better than the first, but they're both god enough for me to proceed.


I haven't ironed them yet, but there they are! All assembled and deceptively simple-looking, given how many hours have been devoted to getting them right. But as usual, I've learned loads, in this case about working with new fabrics and five or seven new things about Sergio. Every minute worth it.

Next up-- assembling the blouse! The biggest challenge will be constructing a casing for the drawstring, but compared to these sleeves, I'm optimistic.

Sunday, June 3, 2012

The Tale of Rose Red, Part 2

Howdy, folks!

Progress on Red Riding Hood is going slowly, only because I've been up to my neck in other pursuits, including an amazing long weekend in New York City last week, and the home stretch of rehearsals for my local theater company's production of The Music Man. Alas, until the first weekend of performances is over (June 15-17) I am resolved not to look at or think of any sewing projects. There just isn't enough time.

However, I did manage to make a little headway into the sleeves for Red's blouse a few weeks ago, and thought since we're in such a dry spell I may as well put up a post about my scant efforts.

The first thing I did was to make a test blouse per the pattern (Butterick 6196), to get an idea of where to start with my alterations.


First off, may I just say that I love making peasant blouses? It was such a breeze! I also got to incorporate one of Sandry's special tricks, which is a stitch that allows you to put down elastic without needing to make casing (on the cuffs of the sleeves). The seam for attaching these sleeves is so much easier than the typical shoulder joint seam in modern sleeve styles. The vest is one I grabbed from my closet.

The first issue, which I knew going in, is that the sleeves need to be shortened for Red's costume. By a LOT. The second thing is, they need lace layers.


The first thing I did was shorten the pattern as shown above. I pulled one of the sleeves off of my test muslin blouse to use as a base for my new custom pattern. Also, note my beautiful new pattern weights. I have recently discovered the tricks of pattern weights and a cutting tool for cutting out patterns (I call it the pizza slicer thingy) instead of the traditional pin & scissors method, and I seriously wonder what was wrong with me for not discovering it sooner. Pinning and cutting is my least favorite part of sewing. So tedious! Now I don't have to do it anymore! This is a good thing for the overall quality of my work and my learning process too, because it means I'm more likely to take the time to do trial garments and get it right before cutting into my final fabric.


After I cut out the shortened sleeve, I used my marking tools to map out the lace vs base sleeve layers on my new custom sleeve.


 A view of the same custom sleeve pattern together, checking on the symmetry of my measurements.


This picture is upside-down. Whoops. But you get the idea (I don't feel like re-uploading it). Here are the individual pattern pieces cut out. I put LOTS of labels and markings to help me keep track of which was which.

 At first I thought I might be able to use the same piece for the two "lace" layers, since they were the same shape and width, but when I cut the sleeve pattern up, I realized that due to the flared nature of the sleeve, they're slightly different lengths, so it was good to keep both of them.


 I cut out the base and lace layers and joined them together. Here is the resulting test sleeve.


Almost all of my edges and seams were acceptably straight, except for the exception you can see above.


I attached the new test sleeve to the base of the peasant blouse. It looks pretty good, but unfortunately, it's not quite right. If you check against the reference photo, the lace layers should be much higher, starting closer to the shoulder. Also, it could still probably stand to be an inch or two shorter.


I am going to need to repeat all of these steps and shift my measurements for where the different layers go.

The good news is, I feel confident that my methodology is good to make a nice sleeve.

The bad news is, I can't figure out where I put the brown paper sleeve pattern. I've been looking for it everywhere....


And that's all the Red progress I'm going to have for another two weeks. I'm starting to get really impatient (and slightly panicked-- Dragon Con is a lot closer than it looks for a methodical sewer like me!) But I know from experience that trying to squeeze sewing in between the cracks of a busy schedule is a bad, BAD idea for me. It's all or nothing. I will wait until rehearsals are done and over and shift gears 100%.

Hopefully I can find that pattern before then, though. Grrrr.

ETA: Found it!! It was folded up and put away nicely in the pattern envelope. How unpredictably tidy of me...

Sunday, May 13, 2012

The Tale of Rose Red, Part 1

Tonight is the season finale for Once Upon a Time. I'm so excited! I invited a couple of friends over. We're going to have a little Finale get-together. I even bought an apple pie for the occasion!

In the meantime, I have officially gotten started on my Red Riding Hood costume, and thought I'd better get started on some progress blog entries too, before I get too far ahead of myself and don't feel like going back. I really want to be a good sewing blogger for the benefit of those looking for reference on my chosen projects!

Today's post will be simple: Just some snapshots and discussions about the fabrics and the pattern I've chosen to use.

This is my main reference photo:


I decided to take the approach of "close enough" with this project. That is, I'm not killing myself looking for exact fabrics or anything of the kind, most especially in the case of the brocade on her vest. I'm organizing the pieces of the ensemble as follows, roughly in order of hardest to easiest:

I. Blouse
II. Vest
III. Skirt
IV. Cape
V. Petticoat
VI. Boots, Gloves
VII. Hair, Basket, etc.

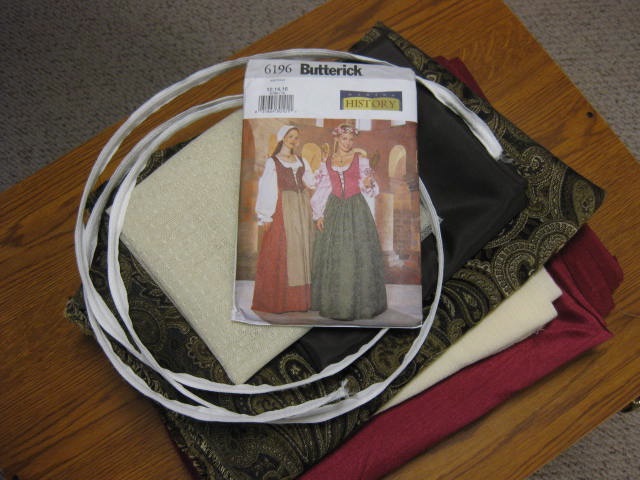
The pattern I've chosen to use is Butterick 6196, since the corset/vest has the rounded neckline, front closure, and pointed waistline of Red's. The peasant blouse and skirt are also suitable, with a few slight tweaks.


For the blouse I bought a buttery-colored crinkle chiffon. It's a wee bit more yellow than Red's, but they didn't have the perfect shade of off-white available.  I also bought 1/2 a yard of decorative tulle in the same shade for the lace layers on her sleeves. This detail on the sleeves, as well as some trim techniques on the neckline are the two reasons that the blouse, for all its simplicity in basic construction, is #1 on my difficulty level list. It's going to require the most patience to get it just right.


The vest fabric was where I really splurged. As I suggested to myself in the original introductory post to this project, I combed up and down the aisles in the home decor fabrics section at JoAnn's until I found the black/brown/grey paisley tapestry fabric shown below. Since that dept of fabrics was 50% off (and I had a coupon above and beyond that), the price of the splurge was significantly less than what it could have been, but I'd still better make darn sure that I get everything right on the vest the first time around. I also bought some brown satin lining and boning as called for by the pattern. (Oh, and black ribbon for the edging, not pictured).


The skirt fabric was an double dose of the "close enough" stance. Studying the picture above, it's clear to see, that the material for Red's skirt is super shiny and crinkly. I actually did find some bolts in the special occasion fabrics very like this, but the red they had was full on 100% red, not the wine/ cranberry/Christmasy kind of red I would consider that skirt to be. More than that, I really just don't want one quite that shiny. Although it's not easy to tell in the photo below, the fabric I found has its own luster, but subtler, and I prefer the color for myself. (Also, it was on clearance!)


And that's all I have for now! I'm going to wait until all of these elements are finished before I proceed to buying fabric and materials for the cape. I've already made a test garment for the blouse and conducted one failed (but enlightening) attempt at constructing the sleeves with those lace layers.