Monday, June 25, 2012

The Tale of Rose Red, Part 3

The Music Man is over! It was a good time overall, but I'm glad the demanding rehearsal and performance schedules are through and I can return my energies to fannish pursuits. At least until the end of August when auditions for Little Women are coming up!

In the past three days I have made splendid progress on Red Riding Hood, particularly finishing off my trial and error with the sleeves and getting them all ready to go for the final product.


When we last left off, the test sleeve looked nice, but wasn't quite close enough to the source costume for my liking. The lace sections were too low on the sleeve compared to Red's.


I cut everything out again, this time moving all the dividers up four inches. After patiently joining and inserting into the test blouse, I was pleased to find the lace fell more or less in the right places this time around. It was still too long and too poofy, though, so I made a few more adjustments to my pattern based on that. (Didn't bother cutting out and testing a third time, though)


The final custom pattern. The darker stripe in the middle is from where I narrowed the sleeve by 2 1/2 inches. I also cut the same amount from the length of the sleeve, taking it from the top half of the fifth section of the pattern. Once nice thing about narrowing the sleeve is that the original sleeve pattern was too big to fold my pattern material and cut 2 simultaneously. Now I was able to do just that (yay, convenience!!)


The next step was to cut out the layers in both my "base" fabric and the lace I bought to go in between. Since neither of these fabrics has an easily discernible "wrong"side, I wrote out a label for all ten pieces as shown above to make sure I didn't get the pieces for the two sleeves mixed up until they were assembled.


Then, I used the serger to finish the edges of each strip with a narrow rolled hem. This took almost a full day of reading, experimenting, and one case of getting up and walking away in order to cool down before beginning again. It's the first time I've used Sergio's narrow rolled hem application, and for the most part I did a good job of allowing myself to learn as well as to apply. As usual, I made it extra hard on myself by choosing two tricky fabrics to work with. As you can see above, the base fabric is very stretchy, and the lace comes with its own set of problems. But Sergio and I worked together and eventually got it sorted.


One interesting side effect of serging the stretchy fabric was that the fabric, well, stretched. That is, it stretched out to where the pieces ended up being longer than their originating fabrics, as shown above. Still, far better than if the serger had somehow shrunk them I suppose.


I joined the pieces together as shown above, always with the lace on top for pinning purposes, and then used two rows of top stitching on the machine to complete the process. I got better and better at this as I went along, so my second sleeve is predictably better than the first, but they're both god enough for me to proceed.


I haven't ironed them yet, but there they are! All assembled and deceptively simple-looking, given how many hours have been devoted to getting them right. But as usual, I've learned loads, in this case about working with new fabrics and five or seven new things about Sergio. Every minute worth it.

Next up-- assembling the blouse! The biggest challenge will be constructing a casing for the drawstring, but compared to these sleeves, I'm optimistic.

Thursday, June 7, 2012

River Song: The Secret Costume

My dearest readers, I have been sneaky. I have been working on a costume behind the scenes and not mentioned a word about it.

Anybody around here like Doctor Who?

How about the indomitable River Song?


This costume is from the episode "A Time of Angels"  Watch her (and the dress! and the accessories!) in action here:


I've been wanting to make this costume for quite a while, and it actually ended up being my easiest project so far, sewing wise. It's also my first foray into wig-buying, as you can see below:


A couple of weeks ago when I was in NYC, I managed to find a pair of adorable, adequate red stilettos. By some wondrous miracle they only size they had left was mine! The cat eye sunglasses I found at Target.


For those doing River Song Byzantium dress research of their own, the pattern I used was Simplicity 3827 (now being phased out). It's the same pattern I altered to make my Inara blouse! If I could start again, however, I wish I'd used Simplicity 1801 instead. It has a cummerbund already incorporated into the pattern (I had to try and add mine on my own and it's kind of sloppy), as well as gathers at the shoulders and waist more in keeping with River's actual dress.

Wig: Link 

There are more accessories I still need to keep my eye out for to "complete" this ensemble-- a handbag, a watch, a handheld scanner thingy (I'm thinking I might track down my old Game Boy Advance and give it a makeover for this) and a tiny gun/blow torch. For a girl dressed to the nines, River is sure prepared for anything!

Sunday, June 3, 2012

The Tale of Rose Red, Part 2

Howdy, folks!

Progress on Red Riding Hood is going slowly, only because I've been up to my neck in other pursuits, including an amazing long weekend in New York City last week, and the home stretch of rehearsals for my local theater company's production of The Music Man. Alas, until the first weekend of performances is over (June 15-17) I am resolved not to look at or think of any sewing projects. There just isn't enough time.

However, I did manage to make a little headway into the sleeves for Red's blouse a few weeks ago, and thought since we're in such a dry spell I may as well put up a post about my scant efforts.

The first thing I did was to make a test blouse per the pattern (Butterick 6196), to get an idea of where to start with my alterations.


First off, may I just say that I love making peasant blouses? It was such a breeze! I also got to incorporate one of Sandry's special tricks, which is a stitch that allows you to put down elastic without needing to make casing (on the cuffs of the sleeves). The seam for attaching these sleeves is so much easier than the typical shoulder joint seam in modern sleeve styles. The vest is one I grabbed from my closet.

The first issue, which I knew going in, is that the sleeves need to be shortened for Red's costume. By a LOT. The second thing is, they need lace layers.


The first thing I did was shorten the pattern as shown above. I pulled one of the sleeves off of my test muslin blouse to use as a base for my new custom pattern. Also, note my beautiful new pattern weights. I have recently discovered the tricks of pattern weights and a cutting tool for cutting out patterns (I call it the pizza slicer thingy) instead of the traditional pin & scissors method, and I seriously wonder what was wrong with me for not discovering it sooner. Pinning and cutting is my least favorite part of sewing. So tedious! Now I don't have to do it anymore! This is a good thing for the overall quality of my work and my learning process too, because it means I'm more likely to take the time to do trial garments and get it right before cutting into my final fabric.


After I cut out the shortened sleeve, I used my marking tools to map out the lace vs base sleeve layers on my new custom sleeve.


 A view of the same custom sleeve pattern together, checking on the symmetry of my measurements.


This picture is upside-down. Whoops. But you get the idea (I don't feel like re-uploading it). Here are the individual pattern pieces cut out. I put LOTS of labels and markings to help me keep track of which was which.

 At first I thought I might be able to use the same piece for the two "lace" layers, since they were the same shape and width, but when I cut the sleeve pattern up, I realized that due to the flared nature of the sleeve, they're slightly different lengths, so it was good to keep both of them.


 I cut out the base and lace layers and joined them together. Here is the resulting test sleeve.


Almost all of my edges and seams were acceptably straight, except for the exception you can see above.


I attached the new test sleeve to the base of the peasant blouse. It looks pretty good, but unfortunately, it's not quite right. If you check against the reference photo, the lace layers should be much higher, starting closer to the shoulder. Also, it could still probably stand to be an inch or two shorter.


I am going to need to repeat all of these steps and shift my measurements for where the different layers go.

The good news is, I feel confident that my methodology is good to make a nice sleeve.

The bad news is, I can't figure out where I put the brown paper sleeve pattern. I've been looking for it everywhere....


And that's all the Red progress I'm going to have for another two weeks. I'm starting to get really impatient (and slightly panicked-- Dragon Con is a lot closer than it looks for a methodical sewer like me!) But I know from experience that trying to squeeze sewing in between the cracks of a busy schedule is a bad, BAD idea for me. It's all or nothing. I will wait until rehearsals are done and over and shift gears 100%.

Hopefully I can find that pattern before then, though. Grrrr.

ETA: Found it!! It was folded up and put away nicely in the pattern envelope. How unpredictably tidy of me...

Sunday, May 13, 2012

The Tale of Rose Red, Part 1

Tonight is the season finale for Once Upon a Time. I'm so excited! I invited a couple of friends over. We're going to have a little Finale get-together. I even bought an apple pie for the occasion!

In the meantime, I have officially gotten started on my Red Riding Hood costume, and thought I'd better get started on some progress blog entries too, before I get too far ahead of myself and don't feel like going back. I really want to be a good sewing blogger for the benefit of those looking for reference on my chosen projects!

Today's post will be simple: Just some snapshots and discussions about the fabrics and the pattern I've chosen to use.

This is my main reference photo:


I decided to take the approach of "close enough" with this project. That is, I'm not killing myself looking for exact fabrics or anything of the kind, most especially in the case of the brocade on her vest. I'm organizing the pieces of the ensemble as follows, roughly in order of hardest to easiest:

I. Blouse
II. Vest
III. Skirt
IV. Cape
V. Petticoat
VI. Boots, Gloves
VII. Hair, Basket, etc.

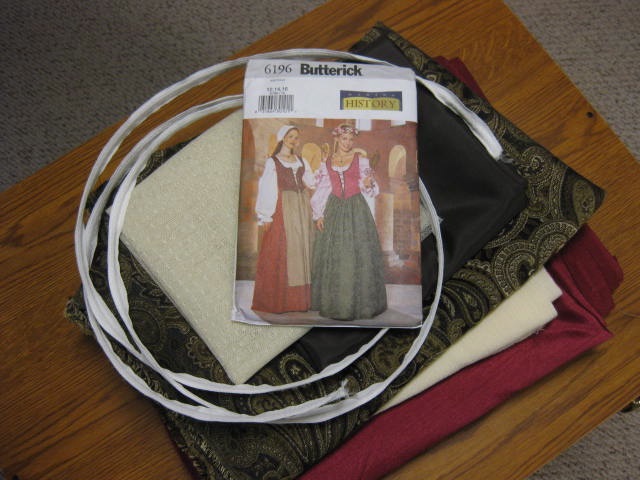
The pattern I've chosen to use is Butterick 6196, since the corset/vest has the rounded neckline, front closure, and pointed waistline of Red's. The peasant blouse and skirt are also suitable, with a few slight tweaks.


For the blouse I bought a buttery-colored crinkle chiffon. It's a wee bit more yellow than Red's, but they didn't have the perfect shade of off-white available.  I also bought 1/2 a yard of decorative tulle in the same shade for the lace layers on her sleeves. This detail on the sleeves, as well as some trim techniques on the neckline are the two reasons that the blouse, for all its simplicity in basic construction, is #1 on my difficulty level list. It's going to require the most patience to get it just right.


The vest fabric was where I really splurged. As I suggested to myself in the original introductory post to this project, I combed up and down the aisles in the home decor fabrics section at JoAnn's until I found the black/brown/grey paisley tapestry fabric shown below. Since that dept of fabrics was 50% off (and I had a coupon above and beyond that), the price of the splurge was significantly less than what it could have been, but I'd still better make darn sure that I get everything right on the vest the first time around. I also bought some brown satin lining and boning as called for by the pattern. (Oh, and black ribbon for the edging, not pictured).


The skirt fabric was an double dose of the "close enough" stance. Studying the picture above, it's clear to see, that the material for Red's skirt is super shiny and crinkly. I actually did find some bolts in the special occasion fabrics very like this, but the red they had was full on 100% red, not the wine/ cranberry/Christmasy kind of red I would consider that skirt to be. More than that, I really just don't want one quite that shiny. Although it's not easy to tell in the photo below, the fabric I found has its own luster, but subtler, and I prefer the color for myself. (Also, it was on clearance!)


And that's all I have for now! I'm going to wait until all of these elements are finished before I proceed to buying fabric and materials for the cape. I've already made a test garment for the blouse and conducted one failed (but enlightening) attempt at constructing the sleeves with those lace layers.


Monday, May 7, 2012

The Lovely Lady

For the past couple of weeks there have been some drastic changes to the sewing scene at home. First I will inundate you with photos and quirky narration, and then I will tell the story.

First: This is my new sewing table. Yes, I have a new sewing table.

 
 Here it is all closed up.


Here is the accompanying supply cabinet.


There are, of course, drawers for things, as one might expect.


There is a handy cubby for Sergio when he's not on duty.


AND a fancy side table that swings out for Sergio when he is on duty.


Quite possibly my favorite feature is the extensions that make the cutting table.


And, naturally, since I had an official cutting table, I got an official cutting mat.
(More on that later)


Truly, this is a beautiful castle, fit for a queen.


... or at least a Lady.


Ladies and Gentlemen, I am proud to introduce the Lady Sandry.

 
 Isn't she BEAUTIFUL!?!?!?!?!


SHE HAS TOUCHSCREEN!!!


 AND A MILLION SCARY-LOOKING FEET!!!!


AND SCARY FANCY ACCESSORIES!!!!


 ...and auto-threading, and USB ports, and way more bells and whistles than I've ever dreamed of using. 

Yet.

Okay, story proper.

I have a friend, Gina, who has become a real life sewing mentor of sorts. She helped me learn how to thread Sergio this past January, and she helped me put some cuffs on a project this past month (which I haven't featured yet because of the A-Z challenge theme going on). 

Both the table and Sandry used to belong to Gina. She's been looking to sell both for a while, and wanted them to go to good homes. I have been contemplating getting a new machine for a while, mostly because after almost two and a half years of sewing, I've finally decided that it's a hobby that's going to stick. Gina made me a good offer for the pair of them, and since her offer for the sewing machine was right around the price range I was looking for, I quickly took her up on it.

Man, oh, man. I practically STOLE this machine.

I say this not as a gloat, but to sort of express my stunned astonishment. I sort of feel like I owe it to every struggling seamstress out there who dreams of bells and whistles to learn every last thing about it just to be WORTHY of the privilege of owning her.

The name Sandry comes from The Circle of Magic #1: Sandry's Book by Tamora Pierce. Sandry is a high class lady indeed, in the story, kind and compassionate, but one of the many reasons I especially loved her as a character was that instead of scoffing at her needlework like most headstrong leading ladies in fantasy these days, Sandry loved her needlework so much her governess sometimes had to urge her to work on something else. (I might have made that part up, actually, it's been a while since I read them-- Laura, Emma, Kate, please correct me if it's only in my imagination). In any case, Sandry ends up having a special magical talent with all manner of threadcraft. I hope, in that spirit, to work some "magic" of my own with my Sandry. :-)

But what about Darth Stitch? you may be asking. Well, technically, Darth Stitch is still my mother's, so his fate will be up to her. As much as I love and have come to respect him, as much as he's taught me, the student's ambitions are starting to surpass the master's capabilities, I fear. It's high time to move on. I'm going to suggest that we give him to my aunt and cousins, who are always coming over here to patch things. Not that I mind having them, quite the contrary. But still. The desire to give good machines to good homes is universal.

So here's my new sewing station, all assembled and ready to go. I can't wait to get started!!!

Monday, April 30, 2012

Z is for Zotah Zhaan

Our final lady for this costume list is Pa'u Zotah Zhaan, a rebel priestess and healer for the zany crew of Moya on SciFi's Farscape.

Zhaan's costume is not for the faint of heart. I think it's pretty clear why:

Basically, I think if you wanted to really pull off Zhaan for a convention, you would have to plan on not sleeping for up to 36 hours.


Zhaan wears a number of costumes through her three-year tenure on the show, most of them in the blue/grey color spectrum (when she's meditating, she doesn't wear anything at all!) The simple robe with fancy collar shown below is probably the simplest from a construction perspective, but even getting the mottled effect of the fabric would be a challenge.


My favorite detail about Zhaan's dress aesthetic are the silver rings she wears on all ten digits.

But yeah, between the bald cap, full facial and hand/foot makeup, colored contacts, fabric dyeing, not to mention having to dedicate the hours just to don the thing... nope, I'm certainly not that dedicated!

Believe it or not, though, some people are. I tip my hat to them!


And with that, we are finished! Thank you all for following along. This has been a fun, enlightening, and at times exhausting exercise. I got a few new inspirations and I hoped maybe a helpful tip or two to anyone attempting these costumes.

Soon we will resume ordinary project-related posts. I have a lot of exciting stuff on the horizon!

Saturday, April 28, 2012

Y is for YoSaffBridge

"Oh please, no one died last time."

I confess, one of the reasons I chose this for my Y entry was just so I could explain the name.

"YoSaffBridge" is a con artist from Firefly.


We first meet her in "Our Mrs. Reynolds" when she shows up on board the ship claiming to be the Captain's new "reward" wife, Saffron.


She manages to convince the entire crew of her identity, before she sabotages the ship and leaves it drifting for parts scavengers.

 Unnecessary photo, but it's one of my favorite frames in all of Firefly so I decided to include it. If there was any chance at all in a "YoSaffBridge" getting recognition at a convention, the 'Saffron' version would probably be the best bet. You might have to learn to crochet that sweater, though.


Later, Captain Mal runs into his ex-wife in the beginning of the episode Trash, and he's none to happy with her. In her latest ploy, she was going by the name of "Bridget" and posing as the wife of one of Mal's old war buddies.


I like "Bridget" best of the YoSaffBridge ensembles. The horizontal ribbing on that blouse would be an experiment in and of itself, but all in all, it's just pretty. I would wear this out in real life too.


Finally, our slippery gal convinces Mal & Co to help her on one of her cons, and in the process they run into the man from whom they're stealing, who she introduces as, you guessed it, her husband. This time her name is "Yolanda".


In a fit of exasperation, Mal calls her "YoSaffBridge" and the name stuck with the fans ever since.